
Glossaries of business terms
A glossary is a curated set of business terms that establishes the official vocabulary used across an organization. It ensures that data models rely on consistent, shared terminology, enabling both business and technical stakeholders to interpret them accurately and uniformly.
In Hackolade Studio, glossaries can be referenced directly within data models. Model objects can be linked to one or more terms from one or multiple glossaries, anchoring each element in an explicit business definition. This linkage clarifies meaning, enforces alignment with business semantics, and promotes consistency across models.
Downstream, this foundation enables a shared understanding of the semantics, meaning, and context of data structures—both for human stakeholders and for AI systems.
Overview
Using glossaries in Hackolade Studio requires an initial step to assign one or more glossaries to your data model to establish which ones are relevant and authoritative for the model -- this step is only required once per model. The glossary assignment is model-specific, as you might assign different glossaries to different models.
After that initial step, you may bind model objects to one or more business terms from one or more glossary terms from these assigned glossaries to modeling objects. This step should be done once per model object.
Assign glossaries to a data model
Before using glossary terms in a data model, you first assign one or several glossaries to that model.
This assignment defines which glossaries are relevant for the model. As your organization may have multiple glossaries, it is possible that only one or selected glossaries are relevant to a given data model. Once assigned, the glossary terms become available for binding with modeling objects, or for creating new modeling objects based on those terms.
You can assign multiple glossaries to the same data model. This allows you to work with terms coming from different domains or sources when needed.
Glossary file format
A glossary file to be used by Hackolade Studio can be the result of an export from any source. The glossary is an external resource provided as a CSV file.
A glossary file should contain at least the following columns:
Term_ID | Term | Description | Domain
The column names do not matter (as long as they are unique), nor the order, as a mapping configuration is available for each glossary.
Important: ensure that each glossary term has a unique identifier. This is required for traceability, for maintaining stable references over time, and to close the loop when publishing models back to a metadata management tool from which the glossaries terms originated in the first place.
The glossary file can reside on your local drive, shared network folder, or preferably in a Git repository so it can be shared across users, so it can be automatically versioned, and so changes can be tracked.
In the current version, glossaries are expected to be provided as CSV files. Future versions may support direct integrations with external glossary providers.
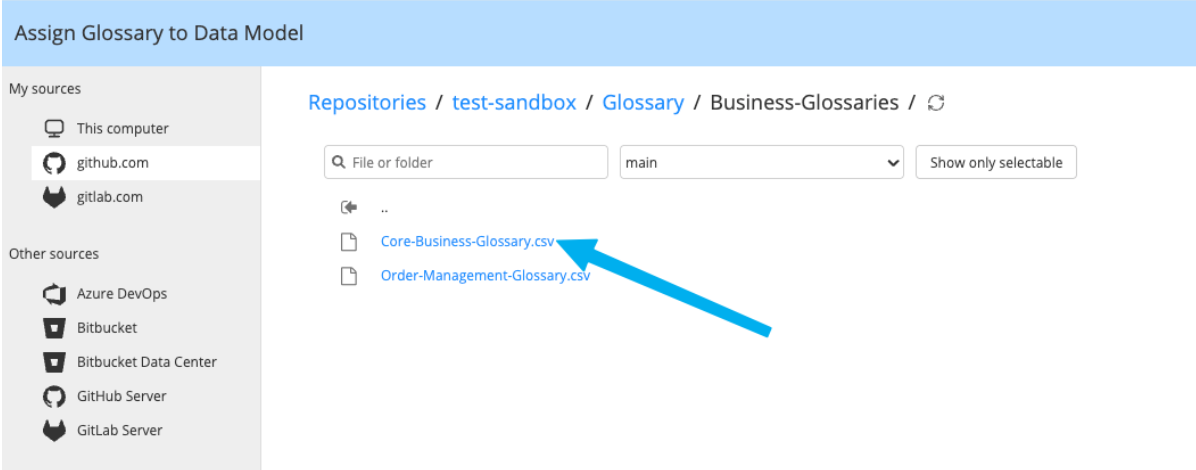
How to assign a glossary
You can assign glossaries from 2 entry points:
- from the menu _Actions > Assign Glossary
- from the model-level Properties Pane: click the + button to add a glossary to the model.
Assigning a glossary is done in 2 steps: select the source file, then define the mapping.
Select source file
Use the dialog to choose a glossary file from your local machine or network drive, or from a Git repository.
Both options are supported, but the choice depends on how your models and glossaries are managed:
- use a local file only when you are working on a local clone and the glossary is part of the same repository
- use a remote repository when the glossary is stored in another repository or when you are not working on a local clone
In general, avoid pointing to standalone local files, as they are not reusable by colleagues. Prefer remote sources for shared glossaries, and local files only when they are part of the same cloned repository.
Define the mapping
This step ensures that Studio correctly interprets the file, understanding which columns correspond to identifiers, terms, descriptions, and other attributes.
Three fields are mandatory and must be mapped:
- identifier (must be unique)
- term
- description
For each of these, you select the corresponding column from the CSV file. A preview is displayed to help you validate that the correct column has been selected.
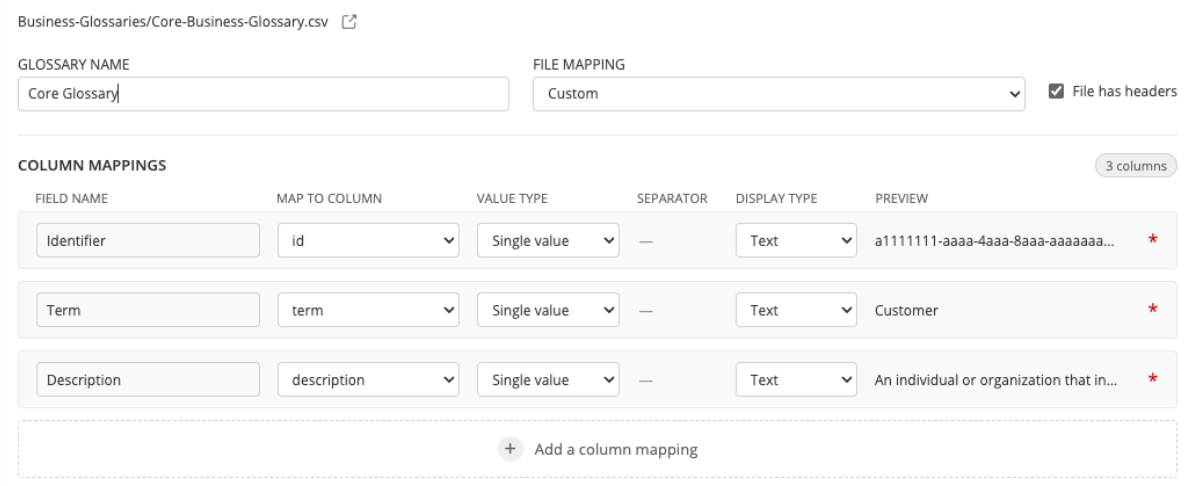
You can also specify whether the CSV file contains headers. If not, the first row is treated as data, and columns are referenced by their position.
You can also define additional mappings for other columns. For each additional field, you can:
- specify a field name
- select the corresponding column
- define the value type (single value or multiple values). For multiple values, you must define a separator (for example `;`). This is typically used for fields such as synonyms which can contain a list.
You can also define how the value is displayed in Studio:
- text
- tag (for example for status fields such as validated or deprecated)
The preview adapts based on your configuration so you can see how values will be rendered.
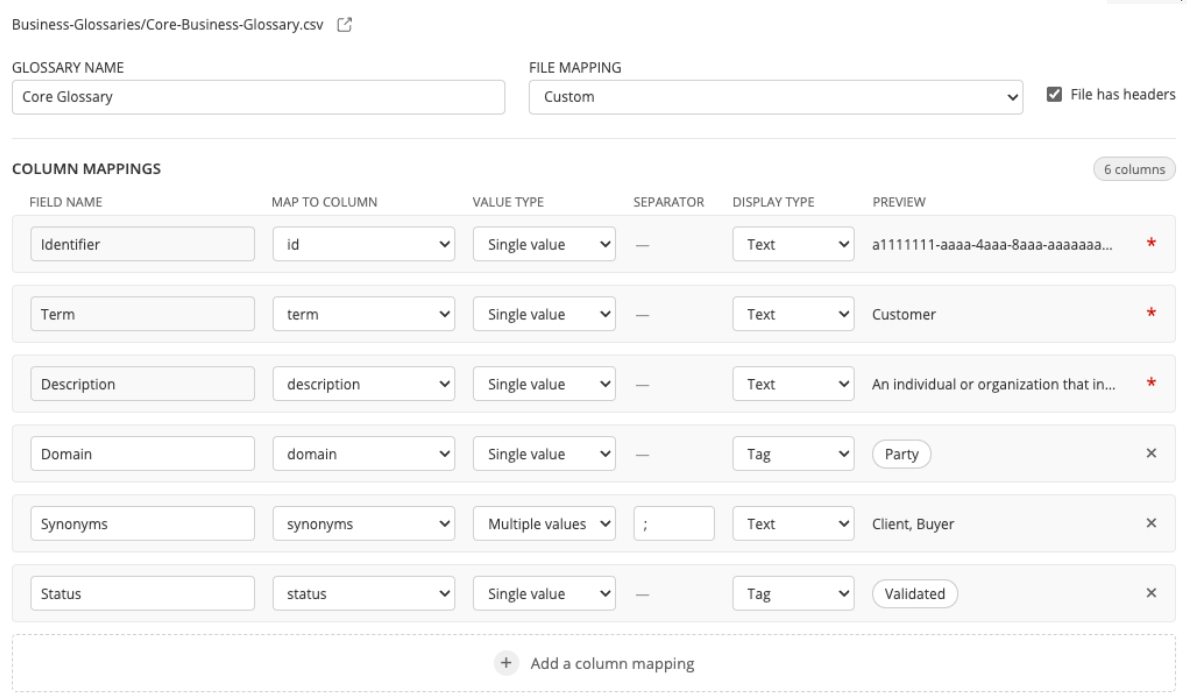
Mapping is optional for non-mandatory fields. All columns remain available in Studio even without mapping. In that case, the field name defaults to the CSV column name.
You can optionally give a name to the glossary, independent from the file name, to make it easier to identify within the model.
During assignment, validations are performed. In particular, the identifier must be unique across all terms. This is required to ensure traceability and to reliably track terms even if their names change over time.
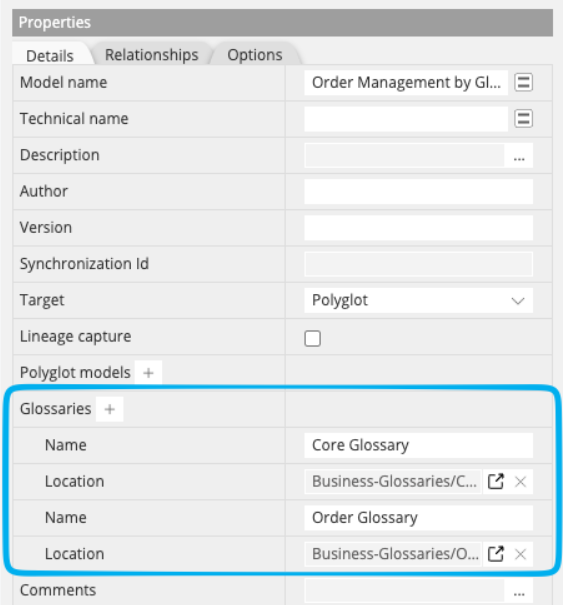
Once a glossary is assigned, it is visible in the Properties Pane of the model. From there, you can unassign the glossary using the cross icon, or open it to consult its source. If the glossary is stored in a remote repository, it opens from that remote location. If it is a local CSV file, it opens using the default application associated with CSV files on your system.
Use glossary terms in a data model
After assigning glossaries, you can use glossary terms in 2 ways:
- bind an existing modeling object to a glossary term
- create a new modeling object from a glossary term
Bind term to existing modeling object
You can bind glossary terms to any existing modeling object, including containers, entities, views, relationships, and attributes.
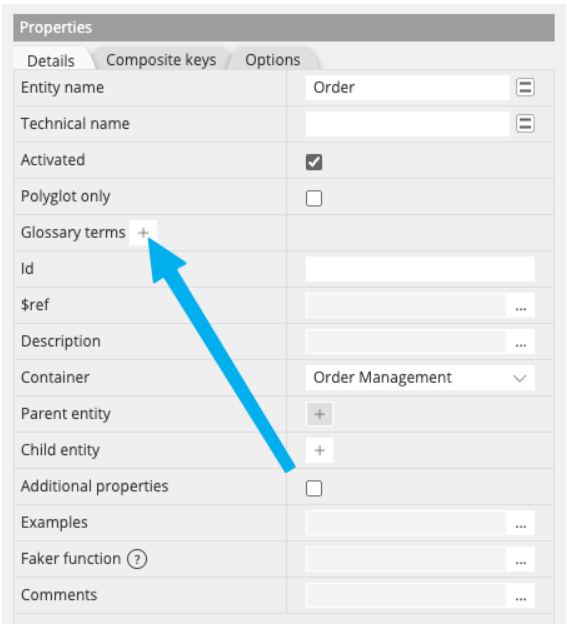
Binding is done from the Properties pane, using the Glossary terms property. This property supports multiple values, meaning a modeling object can be bound to several glossary terms.
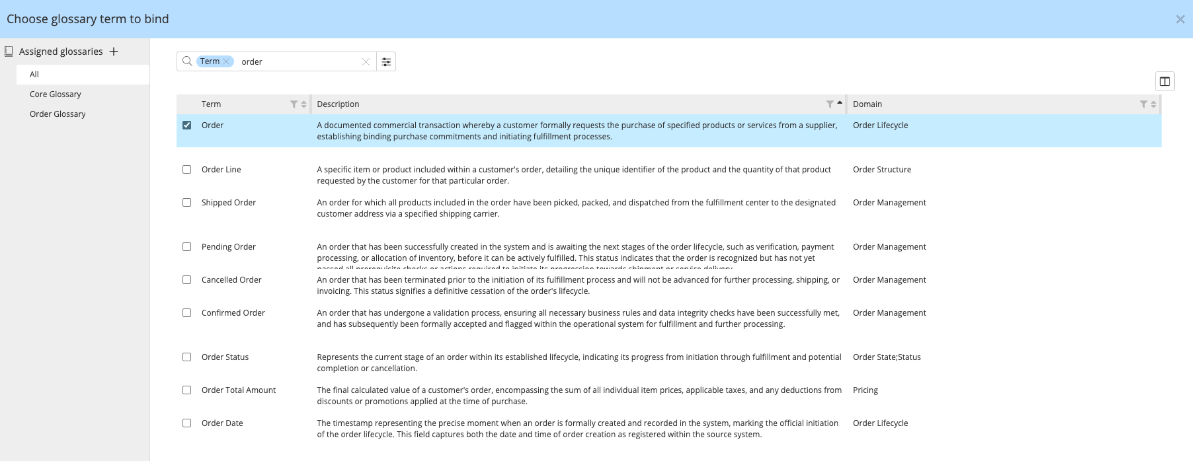
Click the + button to open the glossary browser.
Browse and select terms
The glossary browser displays all terms from the glossaries assigned to the model.
- on the left, you can filter by glossary. By default, All is selected.
- in the center, glossary terms are displayed in a configurable grid.
Each time the glossary browser is opened, the glossary sources are accessed to reflect the most recent available data, whether from a local file or a remote repository.
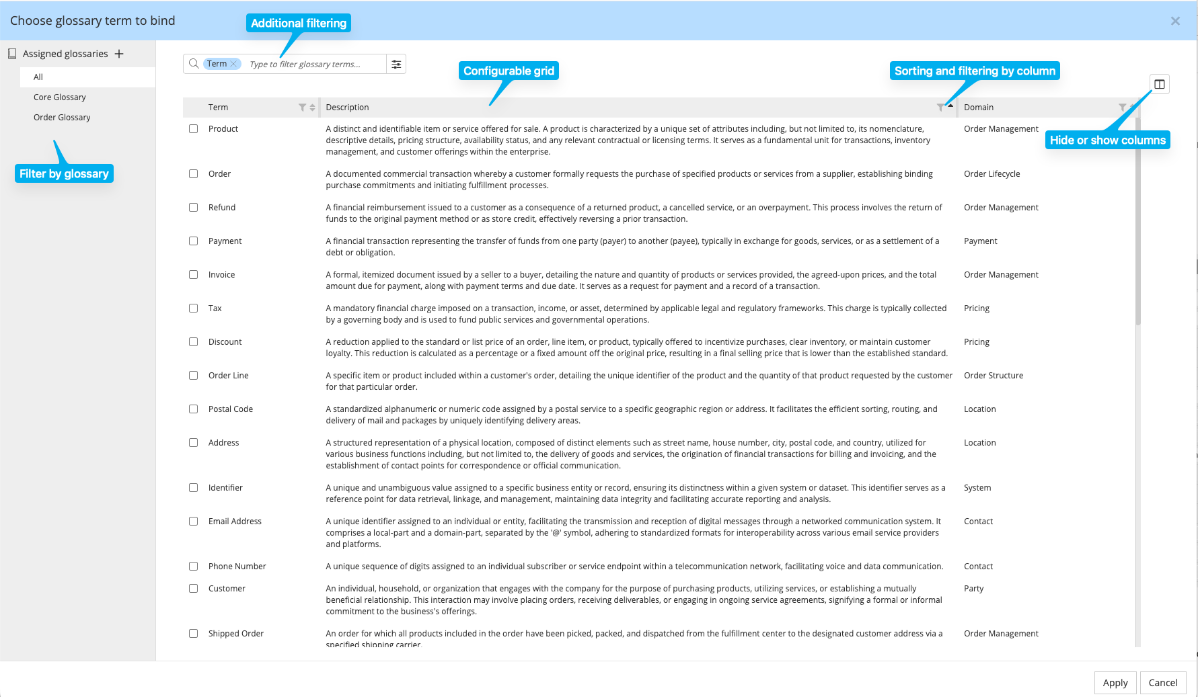
The grid is customizable:
- reorder columns using drag and drop
- sort by any column
- hide or show columns
A filter bar allows you to filter terms as you type, dynamically updating the grid.
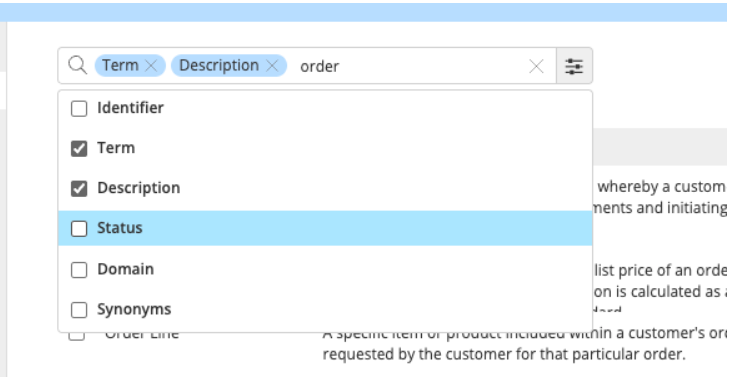
- by default, search is applied to the term field
- you can extend the search scope to other fields if needed
Each column also provides its own filter, accessible from the column header.
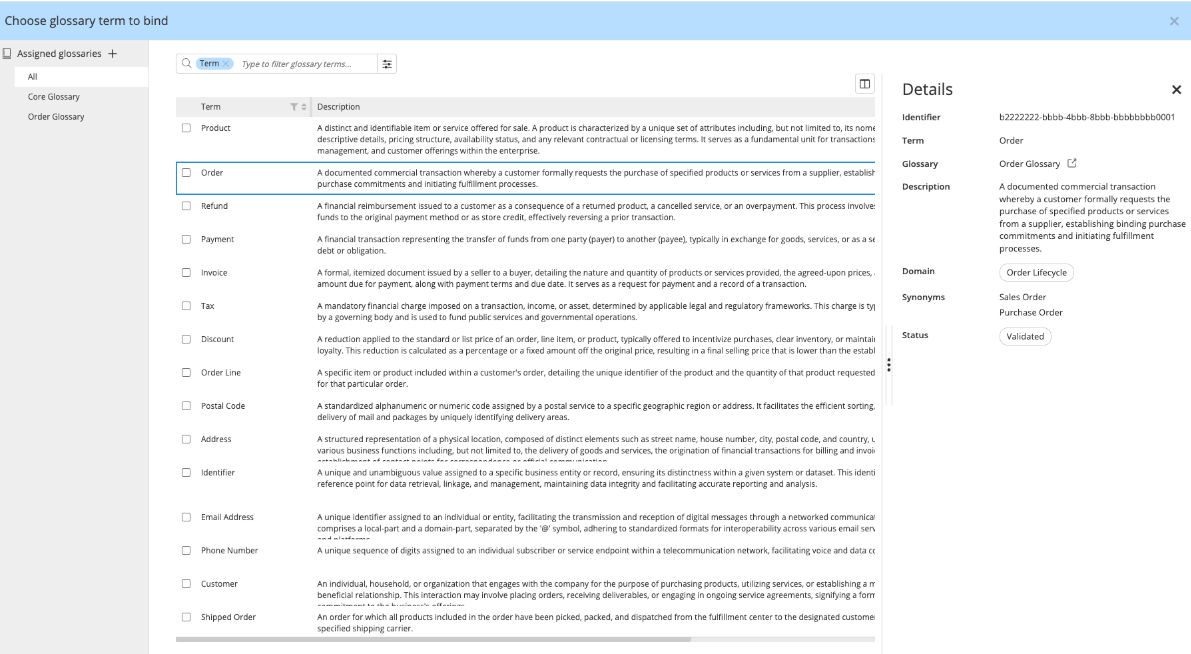
The grid is a master-detail view:
- the main grid shows the columns you configured
- select a row to open a panel on the right displaying all available information for the selected term
Bind terms
Select one or more terms using checkboxes, then click Apply to bind them to the modeling object. 
The selected terms appear in the Glossary terms property in the Properties pane, where you can unbind terms one by one using the cross icon next to each term, add more terms by clicking the **+** button again, or access full details for a term using the three-dot icon.
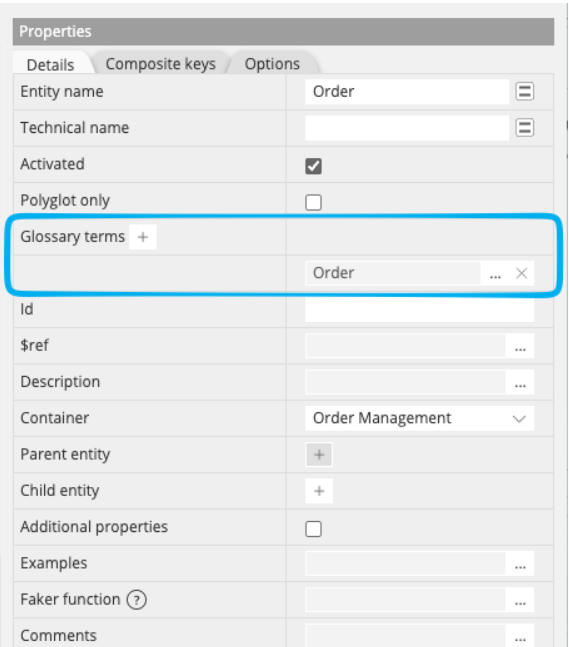
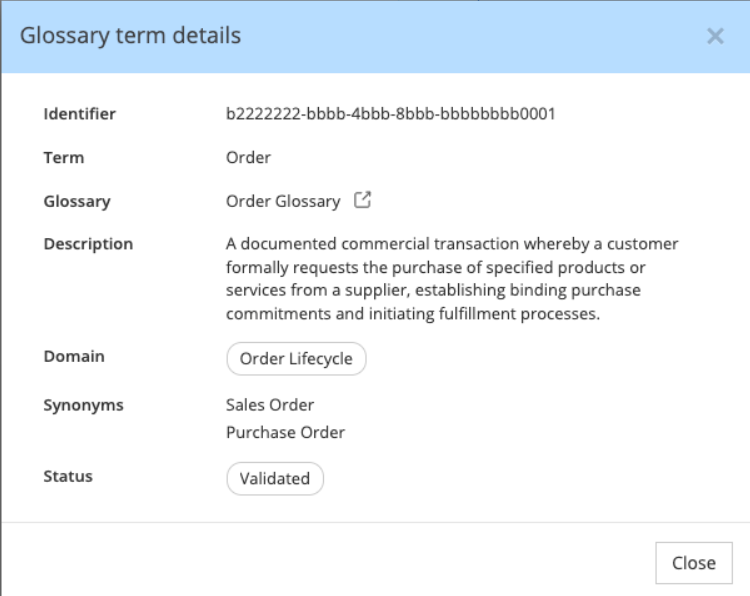
Press the 3 dots ... next to the term to display the term details
Create modeling objects from glossary terms
You can also create new modeling objects directly from glossary terms.
From the context menu, each creation action (such as adding a container, entity, relationship, view, or attribute) provides a Pick from glossary option.
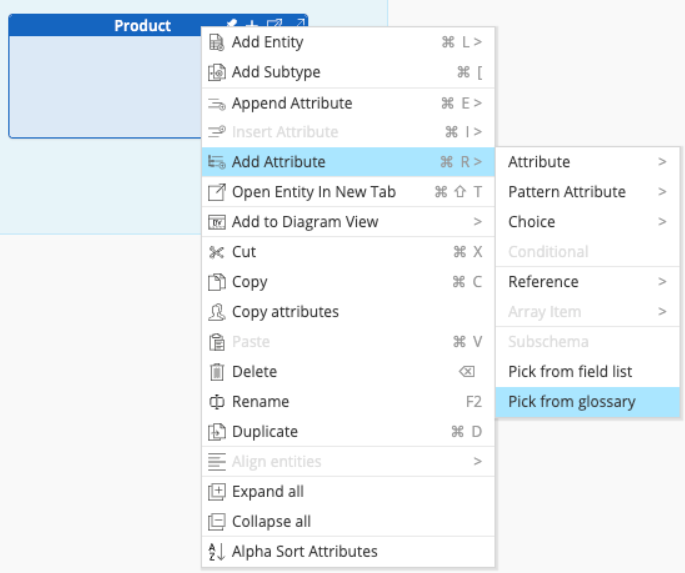
Select this option to open the same glossary browser described earlier, allowing you to browse, filter, and select one or more terms.
After you click the Apply button, the modeling object is created and automatically bound to the selected glossary term(s). The business name of the object is initialized using the selected glossary term instead of a default name such as "New entity" or "New attribute".
If multiple terms are selected, a single modeling object is created, and the business name is constructed by concatenating the selected terms in the order of selection.

